
The built-in reset and refresh options in Windows are not always ideal. Here’s how to get a proper and true clean start with a real fresh install on your PC.
What a clean install really means
This process completely erases the hard drive and results in a total fresh start with a totally vanilla Windows installation. Not even the original bundled pre-installed programs from the factory (if there were any) will remain. This is generally a good and desirable outcome anyway, but you should be able to re-install any utilities you do want from the manufacturer’s website later.
You can also use these same install steps if you purchase a new hard drive, which would of course already be empty and clean from the start. This is also what you’d do if you were to build your own computer and needed to install Windows onto it fresh and new. Microsoft also confirms this method provides the cleanest installation:

Even when I buy a new PC, the first thing I do is perform a full clean install using these same steps. I don’t want the crapware utilities and bundled nagging antivirus the manufacturer was paid to pre-install (Windows Security is just fine, thank you very much), I want a pristine and lean system.
Preparations are in order
Because this completely erases your hard drive for a clean fresh start, you will want to make sure your precious irreplaceable files are safely stored somewhere else. Really, you should already have these backed up at all times since hard drives can always fail without any warning. Keeping your files stored in an online-synced service like OneDrive/Google Drive/iCloud/DropBox is one way to put this chore on auto-pilot and never lose a file, but now is the time to check that everything you really care about is backed up either there or to another computer, hard drive, or even a USB thumb drive.
You’ll also want to make sure you have the product keys or activation codes for any programs you’ll be installing again later. This also includes knowing what your username and password is to your email or gaming accounts like Xbox or Steam so you can login to those again on your “like new” computer.
If your computer originally had Windows 8 or newer installed on it at the factory, you do not need a Windows product key. The little product key stickers from years ago stopped being a “thing” after 2009.
Collect your drivers too
To avoid hassles later, it would be a good idea to visit your computer manufacturer’s website and download your network drivers for your model of computer out of their support/driver download page. Having those available can save hassle in the unlikely event you need them, especially if you don’t have a second computer handy. After you prepare your USB using Microsoft’s tool (described next), copy that downloaded driver file package to it. In particular, make sure you have your storage or network drivers, which can be the largest blockers later if you happen to need them (again, you may not actually need them).

What you’ll need on hand
To get a true and pristine installation, you need to boot-up your computer using the installer media. Years ago, your install media for your operating system may have been CD disc, but these days you can also choose to use a USB thumb drive, which are much faster and easier (plus you can use them for other things when you’re done). You just need an 8 GB or larger thumb drive, which cost just a few dollars. You don’t need to spend a lot of money on this: a suitable drive should cost about the same as a McDonald’s happy meal 🍟🍔, these kinds of flash drives are often even given out like free candy at conferences and trade shows.
What to do
Create your installer media

If you purchased Windows from a store and already have the disc on-hand, you can skip this step. But if you need to create your own install media, you can do so with Microsoft’s aptly named Media Creator Tool, a version of which is available for Windows 10 and Windows 11.
Run the tool, and it will help you turn your USB thumb drive into a setup install drive. You can also use the tool to burn a boot-up DVD. The tool may offer an option to directly upgrade but that would not meet our goal of a true clean install.
Boot from the USB media
Once your installer media is ready, you’re ready to plug it into the computer that needs it (if not already there) and use it, and there are several ways to do that.
- One quick way to reach the Windows boot options is to hold shift while you click the Restart menu, then the next page will have a “use a device” option (it means use a USB). If you can’t login you can also shift+restart from the corner of the login screen.

- The command
shutdown.exe /r /o(o as in options) will restart and go to the boot options menu where you can choose to use a USB device. - If you can’t use the above methods, you can also go to your UEFI (BIOS) and set it to boot from USB as the first preference order at startup, then reboot while the USB is plugged in. You can restart directly to your UEFI options with the command
shutdown.exe /r /fw(fw as in firmware), or by pressing a special access key during system bootup (your manufacturer or favorite search engine can help you find what key to press, it’s usually one of those “F” keys). - Speaking of those access keys, there’s probably also one that lets you choose what drive to boot from on-demand, similar to boot menu you’d reach with the first two bullet items. Your owner manual will show if this is possible.
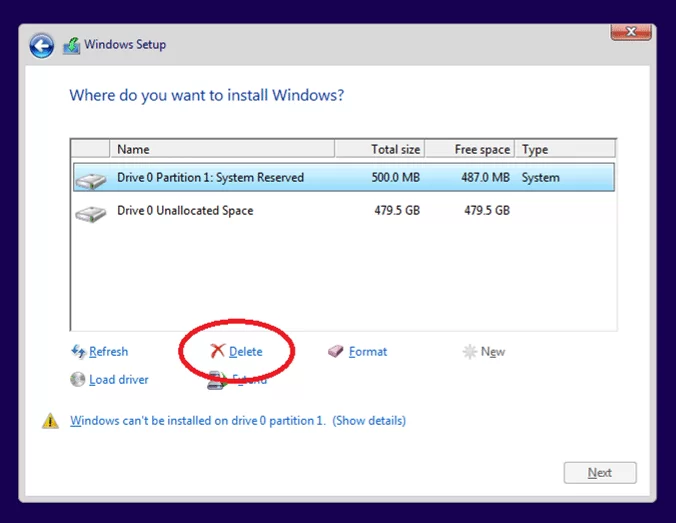
When the system boots from the USB drive, you’ll quickly reach Windows Setup:

Progress through the installation, carefully reading and noting the important terms of service and license rights information. Then you’ll get to the actual cleaning part: when asked where to install and you see a list of hard drive locations, simply delete all the existing partitions from the drive.

When unallocated space is the only thing left remaining in the list, simply click Next.
It will now install for a few minutes to load files from the USB to the internal drive, then it will restart the computer to boot from that internal drive and finish the setup.
When you see the 15-second restart countdown like below, that’s a great time to unplug the USB stick so that it restarts directly from the internal drive instead of looping back to the first screen of USB boot setup.

When it’s finished installing, it’ll ask you the typical things like what time zone you’re in. Then you’re ready to install your favorite programs, apps, and games again and take off using your good-as-new computer. If you use OneDrive or online file storage all your files will come back as soon as you type in your password – convenient.
Final Tasks
Windows will automatically install drivers in the background, and you may see your screen flash or go black momentarily while it updates your graphics card driver. You might also want to visit your system manufacturer and check for any driver updates they have for you too. After this, you’re home free — enjoy your “good as new” computer!
Leave a Reply