
Tools like Microsoft Word have included mail merge capabilities for decades, and they’ve been extended in countless ways by entrepreneurial individuals leveraging visual basic code and other plugins. One of my all-time favorites is Merge Many To One at gmayor.com (but that’s not the subject of today’s post). Today I want to share some of my own solutions for sending personalized emails by iterating through an Excel table and sending an email for each row.
None of these options below are intended for bulk emailing solutions, but if you have between several dozen to several hundred emails to compose with variable data inside, these solutions can be valuable. If you need to send bulk or marketing mail, consider a service like Zoho Campaigns instead. This isn’t any paid endorsement but I will say that I just onboarded a client to Zoho and it was a great experience end to end, both easier and far less costly than Mailchimp.
On-Demand Single Merges with SharePoint and Power Automate Cloud
I’ve created some sort of email merging tool numerous times. Sometimes it’s a single message at a time, like when I added a one-click button to our custom CRM program that emails the current customer a personalized yet beautifully templated email “from” whatever rep clicks the button. It even shows up in their sent folder, but they don’t have to draft it or fill in the customer’s info, that’s all just merged into the email. In truth the CRM does nothing special, it just opens and prefills a text entry field of a SharePoint NewForm.aspx form page with a customer ID, after which a Power Automate cloud flow takes that entry and finds all the necessary customer account info to populate the template email and send it out. It’s a great way to give our reps (and others in the org) the ability to fire off a templated email for any customer in a snap and without any context switching.
Merge Directly From Excel with VBA
Then there’s times where I extended a couple lines of VBA macro code in Excel by programmatically driving an Outlook COM object and creating emails using information from the Excel sheet. This macro has been handy for me in many cases, with results similar to a Mail Merge but it’s just concatenated HTML and fully embedded right inside the same document where the data resides. The simple macro establishes an Outlook object then loops through and sends an email for each row of the Excel table. This heavily-redacted screenshot below still conveys the idea: almost every row of this macro is just appending more text (HTML) into the eBody variable, referencing columns from the Excel table to fill in placeholders like the person’s name. Then it creates an email with that HTML and sends it off.
One other benefit this has over Word email merge is that this macro can easily send using an alternative “from” address of a shared mailbox (note the SentOnBehalfOf property in the code sample). With Word merge, sending from a shared box requires swapping your primary account in Outlook before you send (and even adding modern shared boxes as primary accounts in Outlook is a non-trivial endeavor).

For the convenience, the macro has a number of drawbacks. The code could be improved to a great degree, but it only works on the full classic Outlook. That Outlook has no death date announced yet, but we do know its days are numbered. Depending on your antivirus and other security postures, you may also have to fiddle with Outlook Options/Trust Center Settings to successfully allow for programmatic creation of email messages. Plus, keeping macro-enabled Excel files around is never a great norm in any environment. I’m not sharing this original macro code because this is a very 1990s solution and shouldn’t be encouraged today.
Merge From Excel, but with Power Automate Cloud
This is perhaps the easiest one to setup. The data for your merge can be in an Excel table just like above, with no practical limit to the number of columns. In Power Automate cloud, you can create a flow that sends an email for each row in just a couple steps, and easily reference the column names from Excel as placeholders in your email template.

Other than the initial “start my flow when I push the button” step, it’s only 2 actual steps: (a) get rows of data from Excel table, (b) send email for each row. It’s has nearly* every capability of the aforementioned Excel macro, but none of the macro pain points. You don’t even need a computer or Outlook to use it — you can edit the spreadsheet and launch the process from any browser or phone. This is definitely the modern way, and I’ve implemented something close to the above solution in dozens of instances.
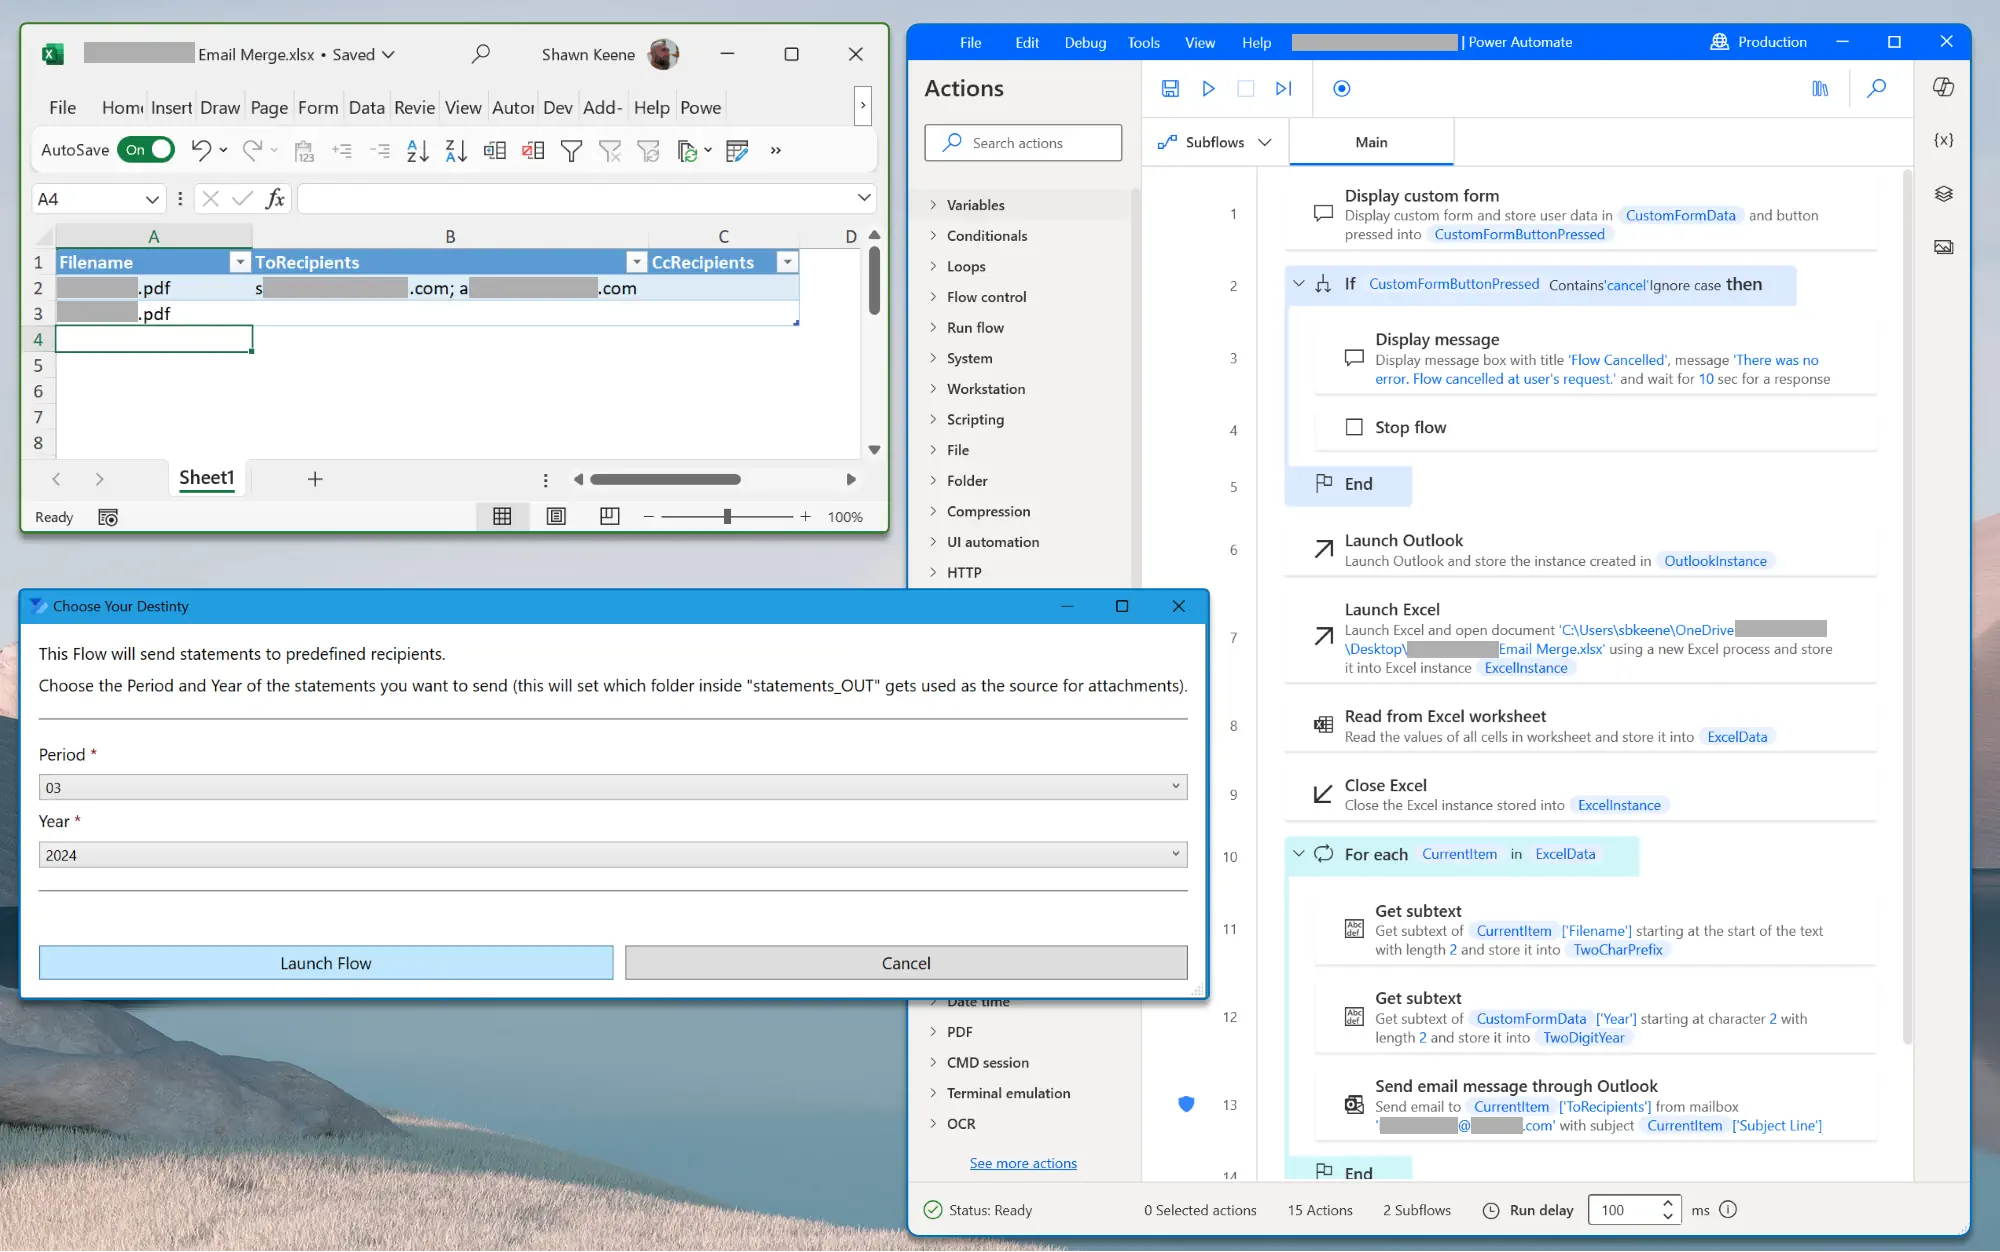
Merge From Excel, but with Power Automate Desktop
Most recently, I setup a simple email merge from an Excel table, with Power Automate Desktop. The reason I chose to use Desktop flow here is because I was building the flow for someone else, and their process involved attaching PDF files from a network folder share to the outgoing email messages. Power Automate Cloud can be configured to access network files with advanced or premium connectors and gateways, but Power Automate Desktop is quite a lot easier to setup quickly, and the process runs entirely on the end-user’s computer. This particular automation took about 5 minutes to setup, and then maybe 15 minutes more adding some nice touches like friendly message boxes for the user. As with the VBA solution above, this only works with the full classic Outlook program (I would guess because Power Automate desktop is still leveraging the same object model).

In this case, the files to be attached (monthly invoice-type statements) are already existing on a network file share, nested inside subfolders based on the year and month of the invoice and then a folder with a two-digit name storing all accounts that begin with that prefix. For example, a statement file path may be as follows for the 3rd month of year 2024 (2403): \\statements\statements_out\2403\03\03123456.pdf.
I’ve also implemented this type of desktop flow above where a JSON text string embedded inside the flow itself contains the filenames to attach and recipients to receive the emails, but here I wanted a more user-friendly way to update the source list so I went with an Excel table.
The statements folder contains millions of files, but the user only needs to send statements to a few dozen of them, so we use the Excel sheet as the primary source here. At runtime, we ask the user what month period and year of statement attachments to fetch and these inputs are converted to the format needed (YYMM) during the flow so that the correct files are selected and attached from the respective subfolders.
Previously this supervisor would have their team go through a list of some dozens of customer accounts and craft individual emails for each one, drilling into the file share directories and attaching the correct file to each one. With this automation, a couple of clicks sends all the necessary emails instantly, turning a several-hour chore into a 10-second task.
Conclusion
As you can see there are a variety of ways to merge data from an Excel table into an email message. In most cases my top recommendation is to build automations fully in the cloud unless some needs dictate a different strategy, and above I’ve illustrated some of the constraints that might guide your choices. Let me know in the comments what strategy you’ve selected for your projects and why.
Leave a Reply